I am thinking of starting out the New Year with a personal challenge of doing some quick, fun, colorful, simple, daily painting in my watercolor journal. Does anyone want to join me? Creating small daily watercolor sketches is a great way to get inspired. It is a great way to warm up to a larger painting.
Here are the Pixie Girls that come to my studio to inspire me to paint…. they are here to welcome in the NEW YEAR! They are saying, “Let’s get painting!”
Showing posts with label #JacquelineNewbold. Show all posts
Monday, December 31, 2018
Thursday, April 12, 2018
Watercolor Journaling, Part 4
- Whitespace is a thing of beauty. When I first started painting, I was told to cover every square inch of the paper with paint. Now I realize that was not the best advice. Not placing color on every square inch of your paper leaves some places for things to sparkle—just like the sunlight! Your white paper is your “white paint” so you always want to save some light!
- Wherever the paper is wet you can bet things are going to spread. Color will travel when the paper is wet, even slightly damp. Use this to your advantage! And learn when to stop. There comes a time when the paper has started to be drier than your brush. This is when it is time to set your brush down and go make yourself some tea :)
- Even when a paper appears dry, it may be damp enough for colors to not stay put which can cause color to feather out. Paper that feels “cool” to the top of your index finger still has moisture in it, so if you want that color to stay exactly in its place, let the paper dry until it feels the same temp as areas that have not been wetted at all before applying color.
Wednesday, April 4, 2018
Watercolor Journaling, Part 3
"Am I done?" "How do I know if I am done?" These are good questions that we all ask ourselves. The answer is "Are you happy with your painting?" Take a break, close your journal. Later, take a fresh look at your painting. Does it need a little something else? Is it lacking a "je ne sais quoi?" This is when I enhance my paintings with pen and ink. This adds dimension and compliments the watercolor. There are several ways to go about adding pen and ink to a painting. The drawing can be drawn first with ink and then painted over with washes of color. I prefer to paint my watercolor painting first then add my ink lines.
Take a close look at this painting from my watercolor art journal. You will see how I added pen and ink to the little French hilltop village.
Would you like to come paint with me in Provence, France? I am teaching a watercolor painting and mixed-media workshop May 10-17, 2019! Registration is now open and the workshop is limited to 12 people. For more information, visit French Escape
Here are more examples of how I add pen and ink to painting in my journals:
.
Wednesday, March 28, 2018
Watercolor Journaling, Part 2
In my last post, Watercolor Journaling, Part 1, I wrote, "It is all about timing and developing a feel for how much water is in the paint, on the brush, and on the paper. The water on the paper is continually drying as you are painting unless you are adding more and more water. Don’t do that! Try to add less and less water as the paint dries. See what happens!" I am hoping that you practiced this and are beginning to see how the relationship between the paper drying, the amount of water in your brush, and the amount of water in your watercolor paint. It is all so fun to play and discover the subtleties of watercolors!
More tips for watercolor journaling:
1. Continue to build up layers and layers of watercolor paint, letting each layer dry before painting the next. Another word for this is glazing. Applying a glaze on top of the same color darkens the value. The more glazes you add, the darker the value will become.
2. You can also glaze with a different color than what you started with. Play with glazing the same colors over each other or choose a different color.
3. Continue painting with glazes until you are done.
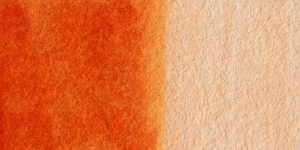
Example of glazing colors on top of each other |
Hint: Don’t spend a lot of time fussing over the part you are glazing. This will start to dissolve the dried layers underneath and will cause the layers to mix, creating mud, instead of laying on top of each other.
Friday, December 22, 2017
Artists Stocking Stuffer Ideas
A new color on my palette is Schmincke Horadam Aquarell Translucent Orange. I absolutely love this color! It mixes well with yellows and reds and is beutiful on it's gorgeous on it's own.

Translucent Orange is considered a transparent color and has excellent lightfastnest meaning that it doesn't fade over time. It is a great color for painting flowers!

Translucent Orange is considered a transparent color and has excellent lightfastnest meaning that it doesn't fade over time. It is a great color for painting flowers!
Saturday, November 11, 2017
Gift Ideas
Did you know that my art work is featured on lots of fun, cool gift ideas with FineArtAmerica? Not only can you buy prints and canvas paintings but they also offer my art on pillows, notebooks, iPhone cases, towels, totes, coffee mugs and much more! Even shower curtains! If there is a painting that you would like to see added please contact me. Check it out!
Thursday, November 2, 2017
Watercolor Journeys
Here are a few pages from my book:

Watercolor Journeys is $22 plus shipping.
Here are just a few emails that I have received about my book:

"I just wanted to follow up with you...I LOVEthe book, I have been pouring over it and working on the lessons - I feel like they should be called "workshops", they have proven to be so productive and interesting for me. Your careful, organized, right-to-the-point explanations and ideas to try out the concepts (especially color mixing, love the chickens:-) has been very helpful, fillling in the holes in my watercolor education. I am having so much fun with it, and not feeling any of the tentativeness or anxiety around the outcome as I have in the past." .....Jeanne
"Got the book today and I do indeed love it! I've already taken a couple of ideas from it for my travel journal [my palette and colour wheel] and will take your book to Italy with me." .....Lori
"I received your book today, and absolutely LOVE it!!! So much so, that I just ordered 2 more, to go along with the additional copies of the DVDs that I purchased." .....Cori

Tuesday, September 19, 2017
Working my Way Around the Color Wheel
I am using my color wheel to pick my colors to go on my new palette. I went from my yellows to oranges, reds, purples, blues and now finally greens. I weeded out lots of colors that are too similar or that don't interest me by using my little color swatches that I painted (see previous posts). It is time to start laying out the tubes of paint in the order that matches the colors on the color wheel.
Thursday, September 14, 2017
More About Yellow Watercolors
I like to make a color swatch of each color. This takes some time but it is fun to do! You can learn a lot about your colors this way. I start by cutting pieces of watercolor paper 3" x 1.5".
I write the name of the color and the manufacturer of the paint on the back side of the paper. Then I wet the front of the paper and paint it. I try to have lay the color on thick and thin to see how dark it can get. When it is dry I write the name of the paint on the front of the paper.
When I decide on a color, I start to lay the tubes of paint around my palette to see where they will go.
Wednesday, September 13, 2017
Yellow
Friday, September 1, 2017
Jacqueline Newbold DVDs
Good Colorful Morning!
Are you new to watercolor and not sure how to get started? I have just the DVD for you! It is Watercolor Toolbox One offered for sale through Artful Gathering Online Art Retreat.
I take you step-by-step on everything you need to know about painting with watercolor. Exploring techniques to get you started on your artistic journey, you will learn the correct way to set up a palette and care for your watercolor art supplies.
You will also learn a variety of basic watercolor techniques. All your examples can be put into a file or journal creating a toolbox for future reference. This workshop on DVD is the perfect introduction to watercolor painting!
Monday, August 28, 2017
Using Black Gesso
I wrote an article for Cloth, Paper, Scissors magazine a while back about creating a very interesting journal page using black gesso. It is a favorite technique of mine and love the look of it in my journals!
Jeannine Stein blogged about it at the Cloth, Paper, Scissors blog.
Here is a little of what she had to say:
In the article “Black-and-White Journal Pages” in the same issue of Pages, Jacqueline Newbold has a fantastic technique for prepping art journal pages and turning them into paper art. Start by painting a watercolor border on all sides of the paper. The beauty of this technique is that even if you’re not that familiar with watercolor, you really can’t go wrong. I sprinkled table salt on some areas of the wet paint to get a textured effect.
Friday, August 4, 2017
Having a Ton of Fun at Art Unraveled 2017
I am always impressed with how creative my students are when we get together and paint. I love showing new techniques and seeing how artists quickly turn them into beautiful paintings! I have one more class to teach call the Creative Page at Art Unraveled. There are three seats left if you are in the Phoenix area and want to join us!
Monday, July 3, 2017
The Best Travel Art Tips for Summer
Check out this great online article by Jeannine Stein - "Best Travel Art Tips for Summer". She has put together 23 ideas from various artists, including me :), on how to create art-on-the-go!
Jeannine says - If you’ve seen the July/August 2017 issue of Cloth Paper Scissors, you may have noticed this on the cover: “23 Tips for Creating While You Travel.” Yes, we’ve loaded this travel and adventure-themed issue with a lot of techniques, projects, and ideas for creating art on the road, and we aim to deliver on our promise. So here are the 23 tips, and where in the magazine you can find them. We hope you find these useful for all your summer art adventures!
Wednesday, May 17, 2017
10 Tips in 10 Days - Drawing
Ok here is my last post for a few days.... I hope you enjoyed my 10 tips! This last one is how I use my pencil - not just for drawing but for measuring and comparing. So grab your favorite pencil (mine is a Ini OC-Gel HD 0.5) and let’s get started!
Here is a lovely ocean scene at the Oregon coast near where I live:
The first thing I do is the hold my pencil vertical and stretch my arm out so that my elbow is locked. All my measurements are done with a locked elbow so that the comparisons will be the same.
How big are the rocks?
With my thumb, I measure from the bottom of Haystack Rock to the bottom at the tallest part. |
Now I measure how wide the rocks are. |
At this point, I would make pencil marks on my paper using these measurements.
For the rest of the tips about using a pencil to measure, go to my post about Drawing Lesson, Part 2.
Tuesday, May 16, 2017
10 Tips in 10 Days - Free EBook from Interweave Press
Here are some fun journaling tips from Interweave Press and Cloth Paper Scissors. This free ebook features my article on Travel Journals, Using Maps as a Starting Point.
Art journaling is a way to express yourself through writing and art at the same time. This creative process pulls together a variety of materials to create mixed-media art. In this free ebook you will get art journaling tips, including how to make a travel journal from maps, how to make an art journal instages, and how to choose the right tools for your art journal adventures!
Sunday, May 14, 2017
10 Tips in 10 Days - Art Online
HAPPY MOTHER'S DAY TO ALL YOU WONDERFUL MOTHERS!
Here is an upcoming chance for you to paint right along with me online! Once a year I teach a watercolor workshop with Artful Gathering Online Art Retreat. This year I am offering a mix of subjects dear and near to my heart! Did you know that before I became an artist, I went to college to get a degree in Botany? Yes, I am a naturalist, botanist, bird watcher, wildlife gardener, flora and fauna expert! Now I am so thrilled to offer you a mix of my two loves: watercolor and nature! This year for the 2017 Artful Gathering Online Art Retreat I am teaching a workshop - A NATURALIST'S WATERCOLOR JOURNAL.
Saturday, May 13, 2017
10 Tips in 10 Days - A Well Rounded Palette
I often have students asking me what colors to put on their watercolor palette. I like to have a well rounded palette so that Each color on the color wheel is represented.
I designed a kit with Daniel Smith Art Supplies called the Jacqueline Newbold Watercolor Traveling Kit. It is a perfect way for beginning watercolor artists to fill their color palette. This kit has it all (just add a pencil!). I picked 12 colors, one for every color on the color wheel, my favorite folding palette, several brushes, a zippered case and an Arches watercolor journal. This would be the perfect companion to go with with my new DVD, Art Journals-On-the-Go. You will be able to create beautiful, colorful paintings with the colors I recommend!

Her is the list of the 12 starter colors:
1. Daniel Smith Watercolor – Lemon Yellow2. Daniel Smith Watercolor – Phthalo Yellow Green3. Daniel Smith Watercolor – Phthalo Green Yellow Shade4. Daniel Smith Watercolor – Phthalo Turquoise5. Daniel Smith Watercolor – Cerulean Blue Chrome6. Daniel Smith Watercolor – French Ultramarine Blue7. Daniel Smith Watercolor – Carbazole Violet8. Daniel Smith Watercolor – Quinacridone Violet9. Daniel Smith Watercolor – Permanent Red10. Daniel Smith Watercolor – Permanent Orange11. Daniel Smith Watercolor – Quinacridone Burnt Orange12. Daniel Smith Watercolor – Hansa Yellow Deep
Friday, May 12, 2017
10 Tips in 10 Days - A Very Small Watercolor Palette
Speaking about palettes here is the cutest palette I have ever seen - It is called the Pocket Palette. It comes with 14 iddy biddy magnetic pans to hold the paint that can be removed and replaced with other colors. It is about the size of a business card (3 5/8" x 2 1/2") but holds lots of paint!
Here it is waiting to be filled with new fresh watercolor paints.
Subscribe to:
Posts (Atom)